1 Open the plugin
Open the Administration menu
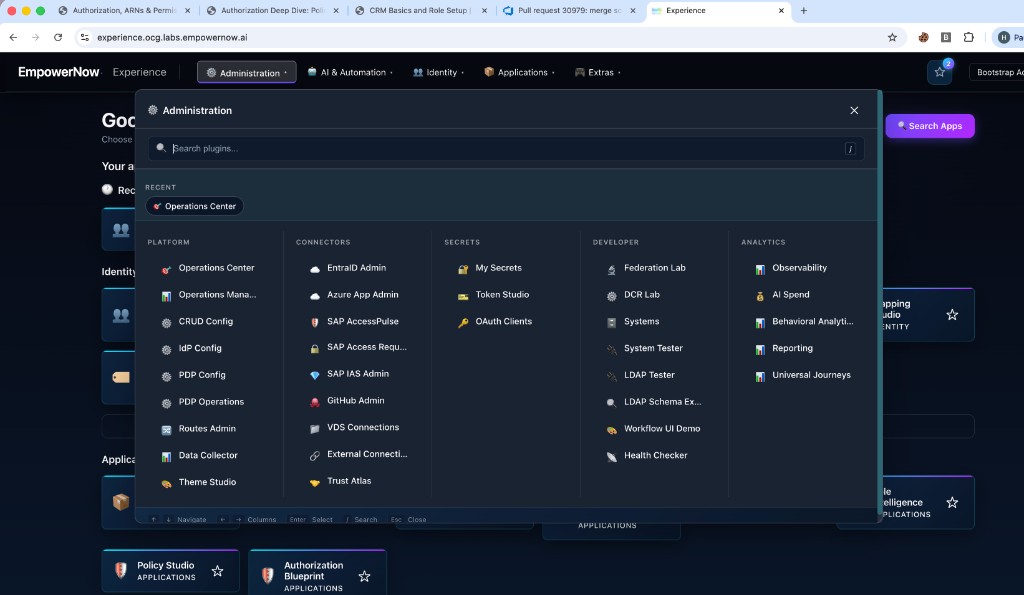
From any page in EmpowerNow, click Administration in the top navigation bar. A plugin picker panel slides open, organised into columns: Platform, Connectors, Secrets, Developer, and Analytics.
Navigate to IdP User Management
Under the Identity menu in the top bar, click Identity Core, then select IdP User Management from the sidebar. Alternatively, type IdP in the Administration search box and press Enter.
The URL will change to /identity-core/idp-users.
If you recently visited IdP User Management, it will appear under Recent at the top of the Administration panel.
2 Reading the dashboard
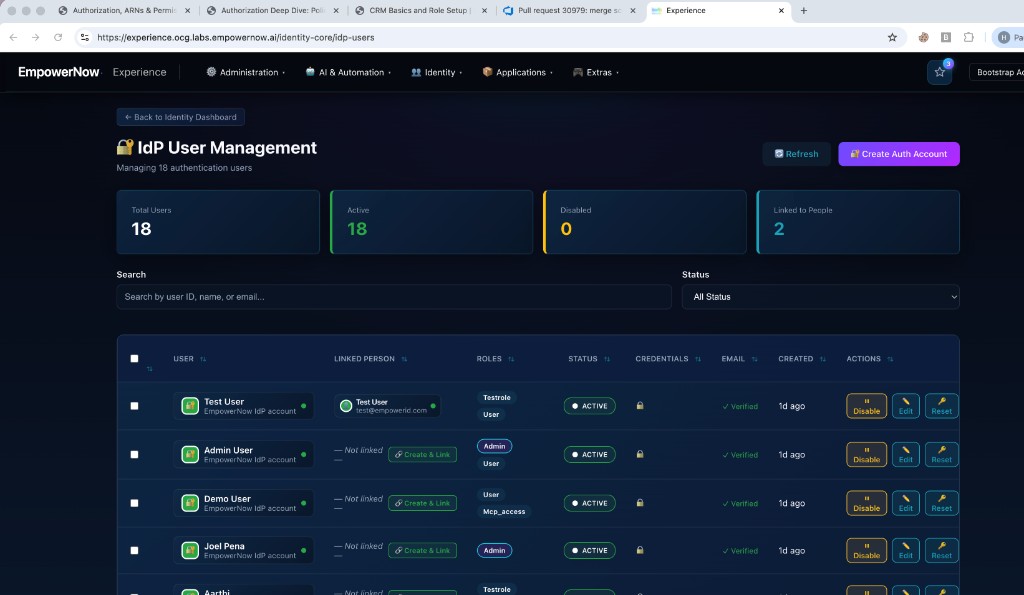
When the page loads you see the full IdP User Management view. Here is what every element means.
The four stat cards
| Card | What it means | Colour |
|---|---|---|
| Total Users | Every authentication account in the local IdP, regardless of status. | Neutral |
| Active | Accounts that can currently log in (status = active). | Green |
| Disabled | Accounts that are blocked from logging in (status = disabled). | Amber |
| Linked to People | Accounts that have been connected to a person identity in the membership directory. Unlinked accounts cannot be governed (access reviews, JML lifecycle, access assignments). | Blue |
🔄 Refresh and 🔐 Create Auth Account
| Button | What it does |
|---|---|
| 🔄 Refresh | Re-fetches the user list from the IdP. Use this after an external change (e.g., a connector provisioned a new account). |
| 🔐 Create Auth Account | Opens the Create Auth Account modal — the primary way to add new users. See Task 4. |
Understanding each column
| ☐ | User | Linked Person | Roles | Status | Credentials | Created | Actions | |
|---|---|---|---|---|---|---|---|---|
| ☐ | Jane Smith jane@example.com · EmpowerNow IdP |
Jane Smith jane@example.com |
Admin User | ● ACTIVE | 🔒 | ✓ Verified | 2d ago |
⏸ Disable
✏️ Edit
🔑 Reset
🗑 Delete
|
| ☐ | Bob Carter bob@example.com · EmpowerNow IdP |
— Not linked — 🔗 Create & Link | User | ○ DISABLED | 🔒 CHANGE | ⚠ Unverified | 5d ago |
▶ Enable
✏️ Edit
🔑 Reset
🗑 Delete
|
| Column | What it shows |
|---|---|
| ☐ Checkbox | Select for bulk operations. The header checkbox selects/deselects all visible rows. |
| User | Display name, email, and provider tag. Click the name to open Account Details (see Task 5). |
| Linked Person | Shows the connected person identity if one exists. If blank, a 🔗 Create & Link button appears — this creates a person record and links it in one click (see Task 9). |
| Roles | IdP roles assigned to this account. Admin appears in purple; other roles appear in blue. |
| Status | ● ACTIVE (green) = can log in. ○ DISABLED (muted) = login blocked. |
| Credentials | 🔒 = has a password. A yellow CHANGE badge means the user must change their password on next login. |
| ✓ Verified (green) = email address confirmed. ⚠ Unverified (amber) = not yet confirmed. | |
| Created | When the IdP account was created. |
| Actions | Per-row action buttons. Active accounts show ⏸ Disable; disabled accounts show ▶ Enable. See subsequent tasks for each action. |
3 Search & filter users
Find a user by name, email, or ID
Type in the Search field above the table. The list filters in real time across three fields: User ID, email address, and display name.
Filter by account status
Use the Status dropdown to the right of the search box. Options:
| Option | What it shows |
|---|---|
| All Status | All accounts regardless of status (default). |
| Active Only | Only accounts with status = active. |
| Disabled Only | Only accounts with status = disabled. Useful for auditing dormant accounts. |
When no results are found
If the search or filter produces no matches, the table is replaced with an empty-state panel showing No Users Found. Two buttons appear: Clear Search (resets both the search text and status filter) and Create New Account.
4 Create an authentication account
The 🔐 Create Auth Account button opens a modal with two modes. Choose the one that fits your situation.
Choose a mode: New Person or Existing Person
At the top of the modal there are two tab options:
- New Person — creates a brand-new person identity in the directory and an IdP account simultaneously. Use this for net-new users.
- Existing Person — adds an IdP account (login credentials) to a person who already exists in the membership directory but cannot yet log in. Use this when a person was imported from an HR feed or connector but has no login.
New Person — fill in the form
| Field | Required | Notes |
|---|---|---|
| First Name | ✱ | The person's given name. Used to auto-suggest the email and display name. |
| Last Name | ✱ | The person's family name. |
| ✱ | Auto-suggested after you type first and last name. You can override it. Must be unique. | |
| Display Name | ✱ | Auto-suggested from first + last name. Shown in the user table. |
| Password | When mode = "Set password now" | Must meet the tenant password policy. A strength bar shows progress in real time. Toggle the eye icon to reveal the password. |
| Confirm Password | When mode = "Set password now" | Must match the Password field exactly. |
| Roles | No | Choose user and/or admin. user is checked by default. admin grants full administrative access. |
If you choose Send setup link, the user receives an email with a one-time link to set their own password. The Create button is disabled until you provide a valid email. The link expires after a short period — if it expires, reset the password manually.
Existing Person mode — full walkthrough
Switch to the Existing Person tab. The form changes: a Person Search field appears at the top. Type any part of the person's name or email — matching records from the membership directory appear as inline suggestions. Click the correct person to select them.
Once selected, the Email field pre-fills from the person record and becomes read-only (locked to the person's email). Fill in the password fields and assign roles, then click 🔐 Create Account.
Search for a person already in your directory and create an IdP account linked to them.
Use this mode when the person already appears in the People list — imported via a connector, created from an HR feed, or added manually — but cannot log in yet. This mode attaches login credentials to the existing identity without creating a duplicate person record.
If you have partially filled in the form and then click the other mode tab, EmpowerNow shows a "Discard changes?" confirmation dialog before switching. Click Discard to proceed or Stay to keep editing.
Email uniqueness and NamingService auto-suggest
Two intelligent behaviours activate as you type in New Person mode:
| Behaviour | When it activates | What you see |
|---|---|---|
| NamingService auto-suggest | After you type First and Last Name | Email and Display Name fields populate automatically. A small Suggested badge appears next to pre-filled values. You can override any suggested value — once you type manually, the field is no longer auto-managed. |
| Email uniqueness check | When you leave the Email field (on blur), 600 ms after typing stops | A small spinner appears below the field while checking. If the email already exists in the IdP, an inline error "Email already taken" appears and the Create button stays disabled until you use a different email. |
After creation — the success screen
On success the modal switches to a success phase with an animated checkmark. The account's name, email, roles, and status are summarised. Three buttons appear in the footer:
| Footer button | What it does |
|---|---|
| Close | Closes the modal. The user table refreshes and the new account appears immediately (optimistic update). |
| + Create Another | Resets the entire form so you can add another account without re-opening the modal. |
| 👤 View Profile | Navigates directly to the linked person's full profile in Identity Core People, then closes the modal. |
The setup link is shown only on this success screen. Once you close the modal the link is no longer accessible. If the user loses it before completing setup, you will need to reset their password manually from the user table.
5 View account details
Click any row in the table
Clicking on a user row (or the user's name) opens the Account Details modal. This is a read-only view of all information about the account.
Sections of the Account Details modal
| Section | What it contains |
|---|---|
| Avatar header | Large initial letter, display name, email, and status badge with a glowing dot. |
| Credential State card | Shows whether a password is set. If the user must change password, a CHANGE badge appears here. Buttons: Force Change Password (marks the account as requiring a change on next login) and Generate TAP (creates a Temporary Access Password for passwordless sign-in). |
| Detail grid (2×2) | User ID (monospace), Created date, Email verification status, Last Login date. |
| Assigned Roles | Role badges for every role on this account. |
| Linked Person | Green banner if a person identity is linked. Amber warning if the account has no person link. |
| TAP Management | Collapsible panel to view, create, and revoke Temporary Access Passwords. |
| Password Policy | Collapsible section (▸ Policy) that shows the current tenant password requirements. |
| Account ARN | The account's identifier in the EmpowerNow resource model: auth:account:empowernow:<user_id>. |
A TAP is a time-limited, single-use password. Use it when a user is locked out and cannot reset via email, or when onboarding a user on a shared device. Click Generate TAP, copy the value, and give it to the user. The TAP appears in the panel with its expiry time.
Actions available from the details modal
| Button | What it does |
|---|---|
| 👤 View Person | Navigates to the person's full profile page in Identity Core (only visible if a person is linked). |
| Force Change Password | Sets a flag so the user must create a new password at their next login. Shows only if the flag is not already set. |
| Close | Closes the modal with no changes. |
| 🔑 Reset Password | Opens the Reset Password modal. See Task 7. |
| ✏️ Edit | Opens the Edit User modal. See Task 6. |
6 Edit a user
Click ✏️ Edit in the Actions column or from Account Details
The Edit User modal opens pre-filled with the user's current values. The User ID is shown at the top as a read-only reference — it cannot be changed.
usr_jane_01
Edit form fields
| Field | Required | What changes |
|---|---|---|
| Display Name | ✱ | The name shown in the user table, Account Details header, and anywhere this account appears in the UI. Minimum 2 characters. |
| Email Address | ✱ | This is the login email. Changing it means the user must use the new address to sign in. Must be a valid email format. The previous email immediately stops working for login. |
| Roles | No | Comma-separated role names (e.g. user, admin, mcp_access). A live badge preview updates as you type. Roles are stored in lowercase. Removing a role takes effect immediately on the user's next action. |
The form sends only the fields that are different from the original values. If you open Edit and click Save without changing anything, the modal closes with no API call.
What IdP roles actually control
IdP roles are platform-level permissions that determine what a user can administer inside EmpowerNow. They are different from access assignments (which control what applications a person can access).
| Role | Who it's for | What it unlocks |
|---|---|---|
user |
All regular users | Can log in, view their own profile, request access, and use self-service features. This is the minimum role every person needs to authenticate. |
admin |
Platform administrators | Full access to all Administration plugins: IdP User Management, PDP Config, CRUD Config, Routes Admin, Operations Center, and all connector admin panels. Assign this only to people who need to configure the platform. |
mcp_access |
Users who need AI/MCP tools | Enables the user to interact with EmpowerNow's Model Context Protocol (MCP) endpoints — used by AI agents and automation tools acting on behalf of this user. Required for any user whose identity will be used by an AI assistant or automation workflow. |
IdP roles control platform administration rights. They are not the same as access assignments, which determine what applications and resources a person can reach. To grant a user access to a business application, use the Access Assignments Workbench — not IdP roles.
admin takes effect immediately
If you remove the admin role from a user who is currently logged in, their admin access is revoked at their next action — they do not need to re-login for the change to take effect. Make sure you are not removing your own admin role accidentally.
How to update a user's roles step by step
- Find the user in the table. Current roles are visible in the Roles column.
- Click ✏️ Edit in the Actions column.
- In the Roles field, the current roles appear pre-filled as a comma-separated string, e.g.
user. - To add
admin: change the field touser, admin. The badge preview immediately shows both roles. - To remove
adminfrom an existing admin: clear the field and type justuser. - To add MCP access: append
, mcp_access— e.g.user, mcp_access. - Click 💾 Save Changes. The table refreshes and the Roles column shows the updated badges.
7 Reset a password
Click 🔑 Reset in the Actions column
The Reset Password modal opens with a warning that the existing password will be overwritten immediately.
Entering the new password
As you type, a Password Strength Indicator bar updates in real time showing: Weak (red), Medium (amber), or Strong (green). The Reset Password button stays disabled until both of these conditions are met:
- The password meets all tenant policy requirements (min length, uppercase, lowercase, digit, special character as configured).
- The Confirm Password field matches exactly.
Toggle the eye icon on either field to reveal/hide the password as you type.
Force the user to change on next login
The "Require user to change password on next login" checkbox is checked by default. With this on, the user's account gets a CHANGE badge in the Credentials column. When they log in, they are immediately prompted to set a new password before proceeding.
Uncheck this box only if you are setting a permanent password for a service account or automated process.
The success screen
On success the modal switches to a confirmation phase. It shows a masked copy of the new password with a 📋 Copy button and a reveal toggle. Copy the password and deliver it to the user through a secure channel. Click Done to close.
Once you close the success screen, the plain-text password is gone. If you forget to copy it, you will need to run another reset.
8 Disable / Enable a user
Click ⏸ Disable in the Actions column
A confirmation dialog appears: "This user will not be able to login until re-enabled." Click Confirm to proceed. The account status changes to ○ DISABLED immediately.
Disabling preserves the account record, audit history, and person link. Use disable during offboarding or investigation. Delete only when you are certain the account and all linked data can be permanently removed.
Click ▶ Enable in the Actions column
For a disabled user, the Disable button is replaced by a ▶ Enable button. Clicking it immediately re-enables the account with no confirmation dialog. The status badge changes back to ● ACTIVE and a success toast appears at the bottom of the screen.
🗑 Delete — permanent removal
The 🗑 Delete button opens a danger confirmation dialog. The message names the specific user so you can verify you're deleting the right account: "This will permanently delete user 'Jane Smith' from the IdP. This action cannot be undone!"
| What gets deleted | What is preserved |
|---|---|
| The IdP account record (user ID, password hash, email, roles) | The Person identity in the membership directory — the person still exists in the People list |
| All active login sessions for this user | Audit history and event logs referencing this user's past actions |
| Ability to authenticate as this user | Any access assignments or collection memberships the person holds (those are governed separately) |
Once deleted, the login credentials cannot be recovered. If you need to offboard a user temporarily, use ⏸ Disable instead — it blocks login without destroying the account. Use Delete only when you are certain the account and its login access should be permanently removed.
Deleting the IdP account does not remove the person from the membership directory. The person will still appear in the People list and retain any access assignments. If you later need to give this person login access again, use + Create Auth Account in Existing Person mode to attach new credentials to their existing identity.
9 Link an account to a person identity
An IdP account that is not linked to a person identity cannot be governed — it will not appear in access reviews, JML workflows, or access assignments. The Linked Person column shows the link status for every account.
Recognise the "Not linked" state
In the Linked Person column, accounts without a link show — Not linked — and a green 🔗 Create & Link button. This happens when:
- The IdP account was created before a person identity existed (e.g. created by an old script).
- The person identity was deleted and re-created.
- A connector created an IdP account without creating a membership identity.
Click 🔗 Create & Link
Click the 🔗 Create & Link button in the Linked Person column. A confirmation dialog appears:
Click ✨ Create & Link to confirm. EmpowerNow will:
- Create a new person identity in the membership service using the IdP account's name and email.
- Link the person identity to the IdP account.
- Update the Linked Person column immediately (optimistic update).
- Show a success toast with a View Person link.
Confirm the link in Account Details
After linking, click the user row to open Account Details. The Linked Person Identity section now shows a green banner with the person's name and email. A 👤 View Person button navigates to the person's full profile in Identity Core People.
Once linked, this user will appear in access reviews, their access assignments will be visible, and their JML lifecycle (Joiner / Mover / Leaver) will be tracked properly.
10 Bulk operations
Select multiple users
Check one or more rows using the checkboxes in the leftmost column. To select all visible rows at once, click the header checkbox. A bulk action bar slides in above the table:
Force Password Change on selected users
Click Force Password Change in the bulk bar. A confirmation dialog shows how many users will be affected. Confirm to set the must_change_password flag on all selected accounts. Each user will be prompted to set a new password at their next login. A CHANGE badge appears in the Credentials column for each affected user.
If you suspect credential compromise across multiple accounts, select the affected users and run Force Password Change. All users will be required to set new passwords before they can continue using the system — without you having to reset each password individually.
Deselect all
Click Cancel in the bulk bar, or click the header checkbox again to deselect all rows. The bulk bar disappears.